
How to Connect My Endpoint to Another System
- Topics covered:
- Create a “Send to URL” action.
- Handle the Response
In the previous tutorial, How to create an endpoint. “Hello World Tutorial”, we learned the basics of the Projects, Actions, Data Flows and the GPM interface. We will be building upon the Hello World project that we created in that tutorial. If you haven't already, we recommend that you go and run through that tutorial before starting this one.
Create a “Send to URL” Action
- Log back in to the Instalink admin panel. Find and open the project that we had created in the previous tutorial, “My First Project”.
- You should be viewing the GPM interface. You should see the data flow we created “If receive call at /hello-world then successfully respond, Hello World!”. We're now going to add a second data flow. This new flow will call the /hello-world endpoint, process the response from that endpoint and then respond to the initial caller. To create a second flow, click on the Insert After node for the action titled “My First Project”. The Insert After node is the small circle that comes down from the connecting line between the actions.

- After you click on the “My First Project” Insert After Node then you will be presented with the new Process form. We're going to create another Listen action.
- Select “IF” as the Operator.
- Select “Listen to Request” as the Action.
- Set the value of “Custom Endpoint Alias” to the following:
send-to-hello-world
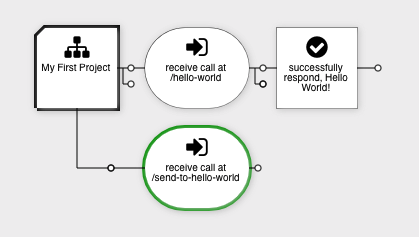
- Click “Save Changes” to create this new action. Your flows should now appear like this.
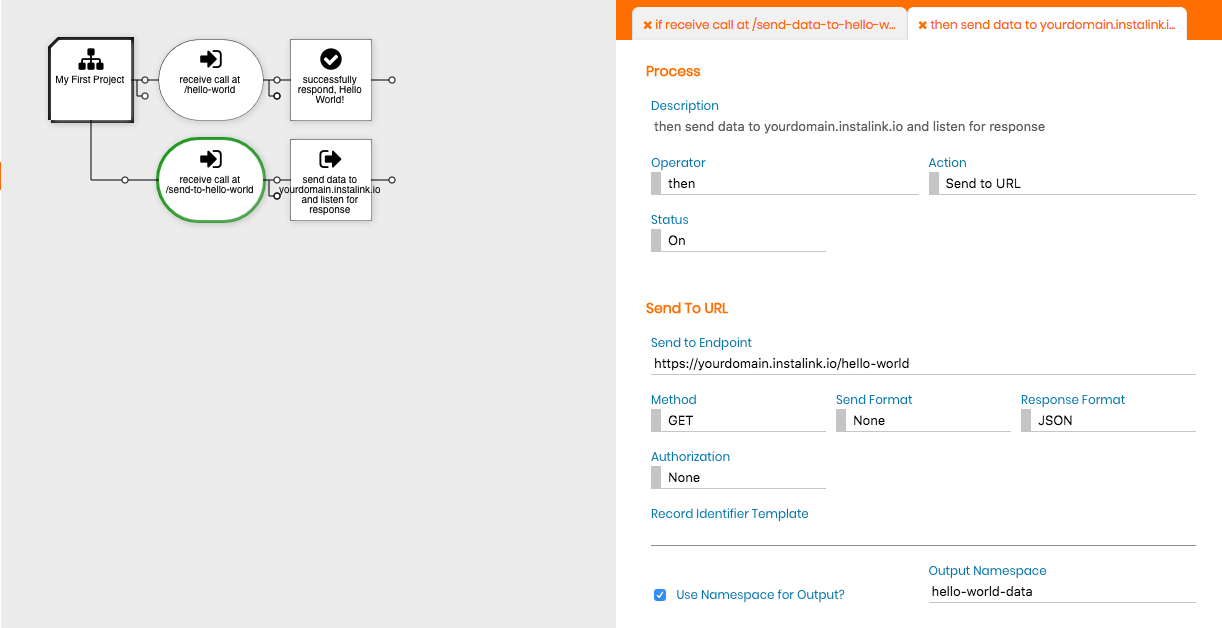
- Now let's create the Send to URL action. Click on the Insert After node for the “receive call at /send-to-hello-world” action we just created to bring up the new process form.
- Ensure that the Operator is set to “THEN”.
- Then set the Action to “Send to URL”.
- Scroll down to the “Send To URL” section that has appeared. Set the field “Send to Endpoint” to the URL that you want to call. In our case we're going to call the hello-world endpoint that we've already set up.
https://yourdomain.instalink.io/hello-world
- Keep in mind that in a real-world use case, you likely call an external service's API endpoint. Here we're calling our own endpoint for demonstration purposes. We'll have much more control over the entire process this way. Remember to replace “yourdomain” with the domain that is assigned to your Instalink account.
- Scroll down a bit further and find the check box labeled, “Use Namespace for Output?”. Check this box to reveal the option, “Output Namespace”. Enter the following in this field:
hello-world-data
- The namespace will allow us to reference the data from this call in actions further down the data flow.
Handle the Response
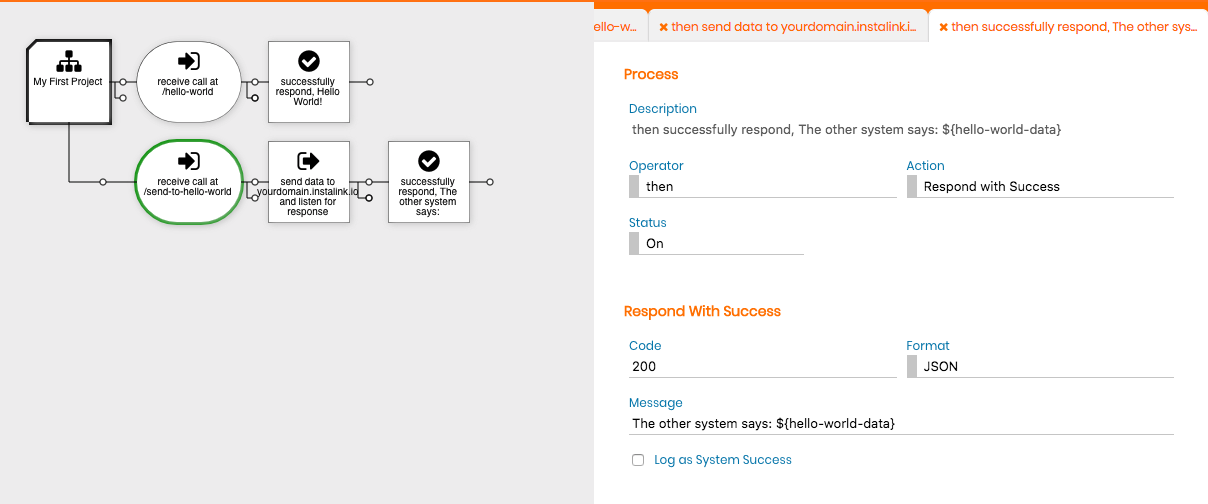
- We're pretty close to being done. The last thing we have to do is add a response action. As a general rule, every endpoint you create needs to have a response action. If the response is missing, then your endpoint will not respond to the user or remote system that is calling it. Click on the Insert After node attached to the end of the Send to URL action we just created to bring up the new process form in the right pane.
- Ensure the Operator is set to “THEN”.
- Set the Action to “Respond with Success”.
- Scroll down to the “Respond with Success” section that has appeared. Change the “Message” field to be the following value:
The other system says: ${hello-world-data}
Notice the dollar sign and the curly brace notation. This is used by the templating system to insert values from the process data into literal values. We'll delve into templating much more in a later tutorial.
Also notice that inside the ${} syntax is the namespace we declared from our “Send to URL” action. You can probably deduce that we will expect the response from the /hello-world endpoint to be included in the response of the /send-to-hello-world endpoint.
- Click “Save Changes” to save your response action. Your data flows should now appear as follows.
- Now let's try it out. Open up a new tab in your browser. Enter the following address in your browser. (One last time, remember to use the domain assigned to your account).
https://yourdomain.instalink.io/send-to-hello-world
If everything worked as expected you should see the following response in your browser.
"The other system says: Hello World!"
If you don't see the response above, be sure to check that data flow matches what we discussed in this tutorial.
Conclusion
Good work! In this tutorial you've learned the basics of sending outbound calls to external systems. Additionally, you received a brief introduction to multiple data flows, data name spacing and templating. We will cover these topics in much more detail in later tutorials.
In the next tutorial, “How to Process and Transform Data”, we'll dig deeper into many of the topics we covered here. We'll also cover data transformation, conditionals and formatting.
